How to Nest Stems and Alternate Versions of Tracks Under Main Versions
Updated October 22, 2021
Nesting your tracks to group alternate versions, cut downs, and stems under their respective main versions is a tremendous organizational benefit.
Instead of having to scroll through many listings of all the different versions of the same track a track whose alternate versions have been nested will show a [+4] on its listing, which can be clicked to reveal its 4 nested alternates.
There are three ways to nest your tracks on your SourceAudio site:
IMPORTANT: Please note, nesting can only be done after publishing your tracks.
1. CSV Import
Importing a .csv file with SourceAudio nesting data in it is generally the most practical method of nesting, especially for large numbers of tracks.
To nest tracks that have been published on your site (do not attempt to nest track that are still in the publishing queue,) begin by exporting a metadata csv from your admin panel > Manage Metadata > Export Data. You can use the tools seen here to only export the catalogs, labels, or publishing date range you’re looking for. Tick the bubble for “only these” and select exactly which catalogs or labels you want to export (cmnd+click to select multiple.)
Once the csv is downloaded, you can begin editing this data to assign alternate tracks to their respective master versions. This data is stored in the Master ID column. When the nesting is complete, the data will look like the image below.
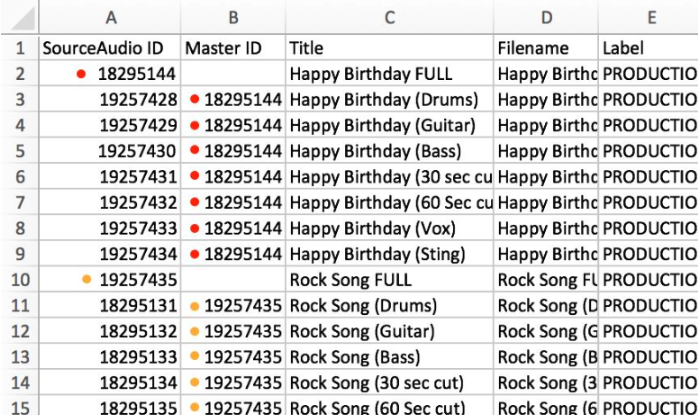
A helpful tip: as you can see in this screenshot, the master ID column has been moved from its original position (typically around column AK) to column B, right next to SourceAudio ID for faster nesting. When this is done, make sure to copy the original column and paste it into its new position – don’t just create a new column and label the header or you could overwrite existing data you have in your master ID column.
Once your Master ID column is next to your SourceAudio ID column, just copy/paste the SourceAudio ID of your master track into the Master ID column of every track you want to nest under it.
For instance, if you had a master track “Happy Birthday” like in the image above, you would copy and paste Happy Birthday’s SourceAudio ID into the Master ID field for “Happy Birthday (Drums)”, “Happy Birthday (Guitars)”, “Happy Birthday (Version 2)”, etc.
Once you’ve done that, save your edited csv and upload in your admin panel > Manage Metadata > Import Data.
That’s it! After completing the import, you should see your tracks nest on your site as the imported data populates. When you export a CSV in the future, you’ll see this data in the Master ID column.
2. The Auto-Nester
The auto-nester is a powerful and convenient tool for quickly nesting tracks, however being an automated system, the auto-nester does not guarantee accuracy, so it’s best used first, before doing any manual nesting such as in methods 1 or 3, because the auto-nester will overwrite any previously existing metadata.
Find the auto-nester in your admin panel > Manage Metadata > Nesting, and click the label that you would like to nest.
On the following page select only the options that apply exactly to your tracks in accordance with their current metadata, and then click to nest in the bottom right.
After the auto-nester has finished running, export a csv from your admin panel > Manage Metadata > Export Data, and proceed with option one above to complete the nesting of your tracks.
3. Nesting from a Track’s Details Page
The third and final method available to nest your tracks is to nest one at a time. This method can be handy if you only need to make a minor change on a few tracks.
Begin by viewing the track you want as the master in its detailed view by clicking its name from a line listing so that the track’s data then takes up the entire screen. Next, click the button along the right edge of the page that reads Edit Track Metadata (the topmost of three buttons), and scroll down to find a button on the right side of the screen that reads Manage Alternates. Click that button and you should see a yellow banner appear across the top of your site explaining that you are currently nesting alternates for that track.
Under Similar Tracks, you should see a small green plus icon appear on every track. Clicking that green plus icon and it will turn into a red minus icon – meaning that the track has been nested as an alternate under your master track. You can click the red minus icon again to unnest the track and turn it back into a green plus.
While managing alternates, you can navigate to anywhere on your SourceAudio site and click the green plus on any track to nest it under the track whose alternates you’re currently managing. When you’re done, just click the Done button in the yellow bar at the top of the screen to finish managing alternates.
Managing the Order of Nester Tracks
You can adjust the order of your nested tracks with the “Nesting Sort Position” metadata field. Enter a numeric value for each nested track, and the tracks will be sorted according to these numbers – the track with the lowest number will appear as the first nested track and the track with the highest number will appear as the last.
You can also adjust your tracks’ nesting sort position by heading to the master track’s detailed page, clicking Edit Track Metadata at the top of the page, clicking Manage Alternates, and then dragging the track up or down in the order by clicking and dragging the icon of six dots next to the track’s title.


YouTube Shorts monetization is now live. Here's what else is new in June.
June was a build-heavy month across our licensing, YouTube, and Collect businesses. We launched a major upgrade to our music-monitoring service, invested in faster and more accurate royalty processing, moved several enterprise integrations...[ READ MORE ]

The operational side of maximizing catalog revenue
One of the clearest indicators of long-term catalog health is whether there’s a real system of record behind it. By that we mean: a single place where the rest of the business can quickly confirm what a work is, who owns it, what iden...[ READ MORE ]

May at a Glance: A Product Update, the Brief Inbox, and a New AI Podcast
The Brief Inbox didn't slow down in May, and neither did we. Column customization shipped, and Drew made an appearance on Morning Brew's new AI podcast to talk music and AI. Drew on The Intelligence Shift Drew Silverstein, our Presid...[ READ MORE ]

Why Brands Are Moving Toward Aggregator-Driven Music Licensing
The way music gets licensed for advertising is changing at the infrastructure level. More brands and agencies are moving toward aggregator-driven ecosystems, where platforms like SourceAudio plug directly into proprietary music discover...[ READ MORE ]

April Recap: Luminate Summit, Blog Post, and What's Coming Through the Brief Inbox
Andrew Talks AI Training Data at Luminate Summit On April 15, SourceAudio CEO and co-founder Andrew Harding joined Doug Shapiro, Dave Davis, Dustin Blank, and Matthew Adell on "The AI Training Data Economy" panel at the Luminate Dat...[ READ MORE ]
Fixing Foundations: How I restructured SourceAudio to be more intuitive for admins, new and old
For over a decade, SourceAudio has been adding features, expanding its reach, and growing alongside the music licensing industry. While our toolset has proven valuable to our client base, it’s important to acknowledge weaknesses that hav...[ READ MORE ]

February Updates: Symphonic Partnership, Best Audio Brands & Product News
SourceAudio x Symphonic We're excited to announce a new partnership with Symphonic Distribution. Symphonic artists and labels can now opt into SourceAudio's AI music dataset licensing marketplace, opening up a new revenue stream ...[ READ MORE ]